What we want to achieve in this tutorial is to create simple REST API (written in Python) which connects to PostgreSQL running as a service on Microsoft Azure cloud. Azure Database for PostgreSQL is a new type of service available on Microsoft Azure cloud – you can read more about this service here.
Our REST API, a Python application, will be based on FLASK framework and will be as platform independent as it is possible – which means, that we will be able to run our application against both Windows Server and Linux Server. For first scenario, we will use Azure App Service (Web App) and the second one can be any Linux Server of your choice – as example, Linux VM on Azure. We will not focus on creating Web App or Linux VM – You can find tutorials on docs.microsoft.com and Azure blogs.
First, we will focus on creating new PostgreSQL server in Azure cloud and new database for our Python project. We will review the ARM template used for creating the PostgreSQL database server and connection parameters for existing PostgreSQL server. Then we will go over deployment methods for Azure Web Apps and Linux server. After that we will review model of our Python application and its view – used for REST communication. FLASK will be our controller. So, after all we will have REST API based on MVC architectural pattern with Azure Database or PostgreSQL under the hood.
At the end of this tutorial we will summarize deployment on both Azure Web Apps and Linux platforms and we will test our application.
Both application code and ARM template are available on GitHub, are open source and licensed under simplified BSD license, so you can reuse it.
Create PostgreSQL server
You can create Azure Database or PostgreSQL server in few ways – via ARM template using RESTful APIs, Azure CLI or through the portal. I will use ARM template and Azure CLI (2.0). I’m working on Mac and Linux only, so it is a natural choice for me. You can find Azure CLI installation guide here: https://docs.microsoft.com/en-us/cli/azure/install-azure-cli. The ARM template for this tutorial can be found here.
Log-in to Azure:
az loginCreate new resource group for our PostgreSQL Server (you can use existing RG if you want to):
az group create -l northeurope -n myprojectClone or download ARM template, go to template directory and edit deploy.parameters.json file. It’s a good time to review most important parts of the ARM template and parameters file.
Template
The first part of the template is PostgreSQL server definition object. Location, as usual (but not necessarily), is inherited from Resource Group location. Next, we are defining name of the server (serverName) which will be used in DNS name of the server – it needs to be globally unique. Next, we have server properties: administrator log-in and password and server storage size. Most important part is sku value – here we are defining SKU name, tier, capacity in DTU, size and the family of SKU. All the SKU-related parameters can be found in Azure DB for PostgreSQL documentation or in Azure API reference.
"resources":[
  {
     "apiVersion":"2016-02-01-privatepreview",
     "kind":"",
     "location":"[resourceGroup().location]",
     "name":"[parameters('serverName')]",
     "properties":{
        "version":"[parameters('version')]",
        "administratorLogin":"[parameters('administratorLogin')]",
        "administratorLoginPassword":"[parameters('administratorLoginPassword')]",
        "storageMB":"[parameters('skuSizeMB')]"
     },
     "sku":{
        "name":"[parameters('skuName')]",
        "tier":"[parameters('skuTier')]",
        "capacity":"[parameters('skuCapacityCU')]",
        "size":"[parameters('skuSizeMB')]",
        "family":"[parameters('skuFamily')]"
     },
The second part of the template is an additional resource created for PostgreSQL server we created above – it is a firewall rule and it depends on server we created. It means, that Resource Manager will wait until our server will be created and then will create this firewall rule for the server. Our firewall rule will have a name and an IP addresses range. The purpose of this rule is to declare which IP addresses will be able to connect to our PostgreSQL server.
     "type":"Microsoft.DBforPostgreSQL/servers",
     "resources":[
        {
           "type":"firewallrules",
           "apiVersion":"2016-02-01-privatepreview",
           "dependsOn":[
              "[concat('Microsoft.DBforPostgreSQL/servers/', parameters('serverName'))]"
           ],
           "location":"[resourceGroup().location]",
           "name":"[parameters('firewallRuleName')]",
           "properties":{
              "startIpAddress":"[parameters('firewallStartIpAddress')]",
              "endIpAddress":"[parameters('firewallEndIpAddress')]"
           }
        }
     ]
  }
]
Parameters
Parameters in parameters file correspond of course with parameters from the template. Login, password and server name are up to you. For skuName I choose PGSQLS3M100 in Basic tier (skuTier) and capacity of 100CU – Compute Units – (skuCapacityCU). SKU size for my server will be 51200 (MB)(skuSize). Last thing related directly to new server, is PostgreSQL version – 9.6 or 9.5 where 9.6 is by default.
At the end of the parameters file you will find parameters for our firewall rule. Our rule’s name will be “AllowAll” and IP range will be 0.0.0.0 to 255.255.255.255 – it means, that we are allowing everyone to connect to our DB server. Of course you can create rules for your home/office IP and your application outgoing IP addresses.
    "administratorLogin": {
        "value": "username"
    },
    "administratorLoginPassword": {
        "value": "password"
    },
    "serverName": {
        "value": "servername"
    },
    "skuName": {
        "value": "PGSQLS3M100"
    },
    "skuTier": {
        "value": "Basic"
    },
    "skuCapacityCU": {
        "value": 100
    },
    "skuFamily": {
        "value": "SkuFamily"
    },
    "skuSizeMB": {
        "value": 51200
    },
    "version": {
        "value": "9.5"
    },
    "firewallRuleName": {
        "value": "AllowAll"
    },
    "firewallStartIpAddress": {
        "value": "0.0.0.0"
    },
    "firewallEndIpAddress": {
        "value": "255.255.255.255"
    }
  }
}
Create deployment from template and parameters file
az group deployment create -g pgtest2 --template-file deploy.json --parameters @deploy.parameters.json
Connect to PostgreSQL server
After deployment, we have brand new PostgreSQL server as a service in Azure cloud. On this server, we have one database out of box – “postgres”. We can login with our administrator login and password. Of course, we don’t want to use privileged user and system database with our Python application. We need new database and user with privileges only for this database.
What we need to do is to connect to our new server, login with admin user to database “postgres”. User your tool-of-choice for this purpose – it does not matter because it is just a standard PostgreSQL server. I will use JetBrains DataGrip. You need to remember about few things:
- Use server DNS name
- Use port 5432 – it’s a standard PostgreSQL port.
- Connect to “postgres” database.
- Your user will be
@ . - Use standard PostgreSQL driver of your choice.
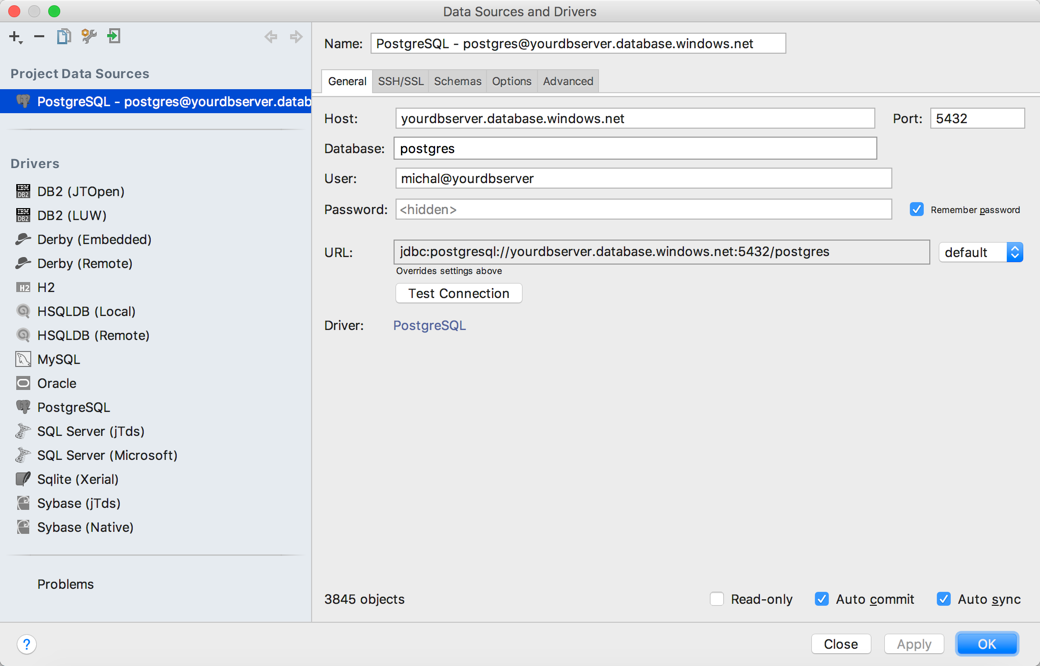
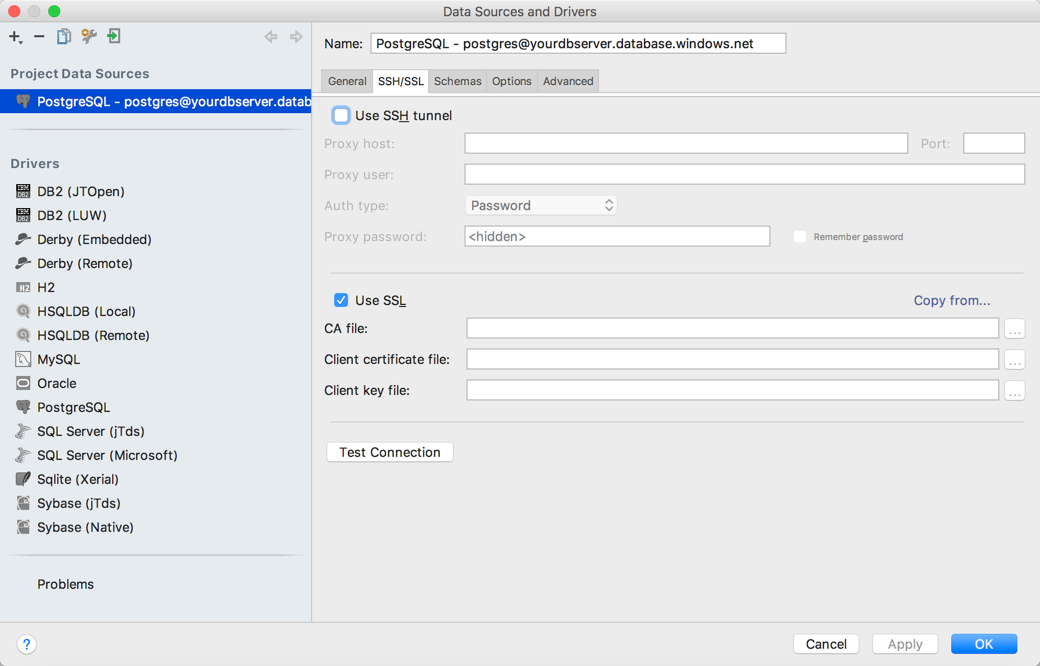
- The most important thing is to enable SSL for this connection.
Create new user and new database
We are creating new user and new database using standard SQL queries. I’m also setting timezone to UTC (it is not necessary), encoding to utf8 and transcation isolation to “readcommited” – for being sure if it is default.
CREATEDATABASE myproject;
CREATEUSER myprojectuser WITHPASSWORD 'password';
ALTERROLE myprojectuser SET client_encoding TO 'utf8';
ALTERROLE myprojectuser SET default_transaction_isolation TO 'readcommitted';
ALTERROLE myprojectuser SET timezone TO 'UTC';
GRANT ALL PRIVILEGES ON DATABASE myproject TO myprojectuser;
“The SET TRANSACTION command sets the characteristics of the current transaction. It has no effect on any subsequent transactions. SET SESSION CHARACTERISTICS sets the default transaction characteristics for subsequent transactions of a session. These defaults can be overridden by SET TRANSACTION for an individual transaction.
The available transaction characteristics are the transaction isolation level, the transaction access mode (read/write or read-only), and the deferrable mode. In addition, a snapshot can be selected, though only for the current transaction, not as a session default.
The isolation level of a transaction determines what data the transaction can see when other transactions are running concurrently:
READ COMMITTED A statement can only see rows committed before it began. This is the default.”
-- PostgreSQL documentation (link)
After that, you should be able to log-in to newly created database with newly created username and password. We can move forward to our Python application.
Application
Our Python application is a simple REST API with two POST methods which operates on two database tables with simple relation. Code of the application need to be as interoperable as possible – it means that we want to run the same code on Azure Web Apps and on Linux server. You can find the application code here.
Application structure
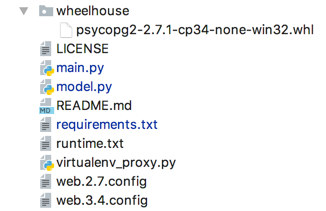
Application repository contains just few files. The application itself is only two of them: main.py and model.py. Our API is MVC application where main.py is a view, model.py is a model and FLASK framework is a controller. requiremets.txt file contains application dependencies needed to be installed (does not matter if on Azure Web Apps or Linux server). The one and only difference between Azure Web Apps deployment and Linux server deployment will appear in requirements.txt file and it will be the way how psycopg2 module is installed. For Linux server deployment, we will just declare psycopg2 module as a dependency in requirements.txt file – like Flask module or SQLAlchemy. But for Azure Web Apps we need wheel – a pre-built package – because building psycopg package on Azure App Service platform will fail due to compiler incompatibility. For Azure Web Apps deployment, we are getting psycopg2 module from wheelhouse directory in our application main directory.
Python application on Azure Web Apps - Requirements (requirements.txt)
Flask-RESTful
SQLAlchemy
requests
wheelhouse/psycopg2-2.7.1-cp34-none-win32.whl
Python application on Linux - Requirements (requirements.txt)
Flask
Flask-RESTful
SQLAlchemy
requests
psycopg2
Hint: If you are going to use another version of psycopg2 package (i.e. newer one) and you will download it from https://pypi.python.org/pypi/psycopg2, choose (as example) psycopg2-2.7.1-cp34-cp34m-win32.whl (it depends on which Python version you will use on Azure App Service platform) and remember to alter a file name, changing cp34m (or similar) to “none”, and then place it in wheelhouse directory.
runtime.txt file determines which version of Python we want to use on Azure App Service platform. In my repository it is python-3.4.
virtualenv_proxy.py script is used to retrieve the WSGI handler, activate the virtual environment and log errors. It is designed to be generic and used without modifications.
web.2.7.config and web3.4.config are IIS configuration files for both Python 2.7 and 3.4 versions – which of them will be used by Azure App Service platform depends on which runtime will be choosen in runtime.txt file.
Model: SQLAlchemy + psycopg2 (model.py)
To create our API model, based on PostgreSQL as a Service in Azure cloud, we will use SQLAlchemy:
To create our API model, based on PostgreSQL as a Service in Azure cloud, we will use SQLAlchemy:
“SQLAlchemy is the Python SQL toolkit and Object Relational Mapper (ORM) that gives application developers the full power and flexibility of SQL. It provides a full suite of well known enterprise-level persistence patterns, designed for efficient and high-performing database access, adapted into a simple and Pythonic domain language.”
https://www.sqlalchemy.org/
Our model will be responsible for creating a database schema and using it in object-like style, including relations. Below you will find complete listing of our model’s code:
from sqlalchemy import Column, Integer, Sequence, String, ForeignKey, DateTime
from datetime import datetime
import psycopg2


engine = locals().get('engine', None)
Session = locals().get('Session', None)
Base = locals().get('Base', None)
initialized = locals().get('initialized', False)


db_user = 'myprojectuser@yourdbserver'
db_pass = 'password'
db_host = 'yourdbserver.database.windows.net'
db_port = '5432'
db_name = 'myproject'


if not engine:
    engine = create_engine("postgresql+psycopg2://{}:{}@{}:{}/{}?sslmode=require".format(db_user, db_pass, db_host, db_port, db_name))


if not Session:
    Session = sessionmaker(bind=engine)
if not Base:
    Base = declarative_base()


class User(Base):
    __tablename__ = "users"
    id = Column(Integer, Sequence('check_id_seq'), primary_key=True, index=True)
    date_time = Column(DateTime, default=datetime.utcnow)
    client_id = Column(Integer, ForeignKey('clients.id'))
    url = Column(String(255), default='url')
    client = relationship("Client", back_populates="user")


class Client(Base):
    __tablename__ = "clients"
    id = Column(Integer, Sequence('clients_id_seq'), primary_key=True, index=True)
    name = Column(String(255), nullable=False, index=True, default='name')
    user = relationship("User", back_populates="client")


Base.metadata.create_all(engine)
The most important parts for us are:
Database credentials declaration
dbuser = 'myprojectuser@yourdbserver' dbpass = 'password'
dbhost = 'yourdbserver.database.windows.net'
dbport = '5432'
db_name = 'myproject'With four variables, we are declaring the credentials needed to connect to our previously created PostgreSQL server and database.
Creating DB engine
engine = createengine("postgresql+psycopg2://{}:{}@{}:{}/{}?sslmode=require".format(dbuser, dbpass, dbhost, dbport, dbname))With “.format” method we are constructing connection string for create_engine SQLAlchemy function. For that, we are using variables declared above. .format method output will be:
postgresql+psycopg2://dbuser:dbpass@dbhost:dbport/db_name?sslmode=require
Note “sslmode=require” parameter in connection string. It’s similar to “Use SSL” step when we were connecting to our DB server for creating new database and user.
Creating DB schema
Base.metadata.create_all(engine)
It needs to be used just once, at the beginning, but it can be always present in the model’s code – it does not bother.
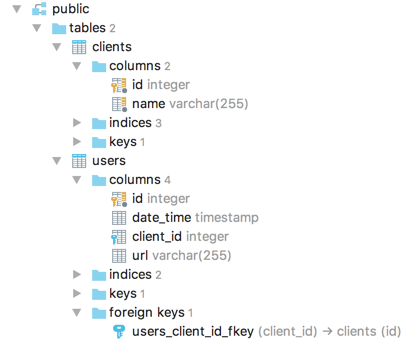
Basing on our two classes: User and Client, two tables will be created: users and clients.
Code:
class User(Base):
    __tablename__ = "users"
    id = Column(Integer, Sequence('check_id_seq'), primary_key=True, index=True)
    date_time = Column(DateTime, default=datetime.utcnow)
    client_id = Column(Integer, ForeignKey('clients.id'))
    url = Column(String(255), default='url')
    client = relationship("Client", back_populates="user")


class Client(Base):
    __tablename__ = "clients"
    id = Column(Integer, Sequence('clients_id_seq'), primary_key=True, index=True)
    name = Column(String(255), nullable=False, index=True, default='name')
    user = relationship("User", back_populates="client")
In clients table, we will store client name – it will be a string with maximum of 255 characters, it cannot be null, it will be indexed and the default value for it will be “name”: name = Column(String(255), nullable=False, index=True, default='name'); with unique id - it will be integer, it will be a primary key for the table, it will be indexed and it will be automatically increased for new records: id = Column(Integer, Sequence('clientsidseq'), primary_key=True, index=True).
In users table, we will store some user’s URL – it will be a string with maximum length of 255 characters and default value as “url”: url = Column(String(255), default='url'); with unique id – it will be integer, it will be a primary key for the table, it will be indexed and it will be automatically increased for new records: id = Column(Integer, Sequence('checkidseq'), primarykey=True, index=True);
with timestamp in datetime column – it will be DateTime timestamp with UTC date and time of record creation: datetime = Column(DateTime, default=datetime.utcnow);
and client id in clientid column which will be the foreign key in clients table: clientid = Column(Integer, ForeignKey('clients.id').
It is possible because of relations created in both User and Client classes:
client = relationship("Client", backpopulates="user")
user = relationship("User", back_populates="client")
API controller and view: FLASK framework (main.py)
Our application’s controller and view are FLASK framework and flask_restful module. Our model will be used here, so we need to import it – we are importing our model as db: import model as db.
Our API have two POST methods and for both there is an argument parser, which is processing POST data:
- client_id
Client ID from clients table. - url
Some url to be putted in users table. - client_name
Client name to be putted in clients table.
newclient method
At first, we need a new client in clients table. We will use /api/newclient API method handled by post() function where command is newclient:
    elif command == 'newclient':
        args = parser.parse_args()
        client_name = str(args['client_name'])
        session = db.Session()
        new = db.Client(name=client_name)
        session.add(new)
        session.commit()
        session.close()
        odp = 'Client added'
        response = make_response(odp, 200)
        return response
client_name argument from POST request data is parsed as variable. Next, database session is created using our model: session = db.Session(); Then, using Client class we are creating transaction where client_name variable content is assigned as a value for name column in clients table. With session.add(new) function we are adding a transaction and with session.commit() function we are commiting it. Last thing in DB integration step is to close the session with session.close(). The last thing our API need to do is to response with 200 HTTP code and some information. Here it will be 'Client added'. Of course, it can be JSON or other data.
create method
Having a new client in clients table, we will use /api/create API menthod handled by post() function where command is create, to create new record in users table:
    if command == 'create':
        args = parser.parse_args()
        client_id = str(args['client_id'])
        url = str(args['url'])
        session = db.Session()
        new = db.User(client_id=client_id, url=url)
        session.add(new)
        session.commit()
        session.close()
        odp = 'User added'
        response = make_response(odp, 200)
        return response
client_id argument from POST request data is parsed as variable – it is an ID of the client from clients table and this way we are creating a first relational structure between our two tables. The second argument parsed form POST data is url. It will be putted to the table. Next, as previous, database session is created using our model: session = db.Session(); Then, using User class we are creating transaction where clientid variable content is assigned as a value for clientid column in users table and url variable client is assigned as a value for url column in the same table. With session.add(new) function we are adding a transaction and with session.commit() function we are commiting it. Last thing in DB integration step is to close the session with session.close().
The last thing our API need to do in this method, like in first one, is to response with 200 HTTP code and some information. Here it will be 'User added'. Of course, it can be JSON or other data.
Full listing of our simple code:
from flask import Flask
from flask import make_response, jsonify, render_template
from flask_restful import Api, Resource, reqparse
import model as db


app = Flask(__name__)


api = Api(app)


parser = reqparse.RequestParser()
parser.add_argument('client_id', type=str)
parser.add_argument('url', type=str)
parser.add_argument('client_name', type=str)


class Create(Resource):
    def post(self, command):
        if command == 'create':
            args = parser.parse_args()
            client_id = str(args['client_id'])
            url = str(args['url'])
            session = db.Session()
            new = db.User(client_id=client_id, url=url)
            session.add(new)
            session.commit()
            session.close()
            odp = 'User added'
            response = make_response(odp, 200)
            return response
        elif command == 'newclient':
            args = parser.parse_args()
            client_name = str(args['client_name'])
            session = db.Session()
            new = db.Client(name=client_name)
            session.add(new)
            session.commit()
            session.close()
            odp = 'Client added'
            response = make_response(odp, 200)
            return response
        else:
            odp = 'Bad Request'
            response = make_response(odp, 400)
            return response


api.add_resource(Create, '/api/<command>')


if __name__ == '__main__':
    app.run()
Deploy to Azure Web Apps
To deploy our application to Azure Web Apps, just use continuous deployment facility with GIT (or another CVS you like). Azure App Service platform will detect that you are deploying Python application, and basing on runtime.txt content, it will create proper virtual environment. After few moments your application will be up and running, available under web app address.
Deploy to Linux
If you want to deploy our API application to Linux server, use source control management system or copy application files to the server. Then create virtual environment (it is better to use virtual environment than global Python distribution, because your application will be separated form system parts where root privileges are needed). Next, you need to install requirements with pip install –r requirements.txt command and run the applciation with preferred application server – Gunicorn as example:
$ gunicorn --workers 2 --bind 0.0.0.0:8001 main:app
As you see, I’m running our application at 0.0.0.0:8001 address and port. Four zeros address means, that it will be running on all interfaces – it can be 127.0.0.1 if you want to use it only on localhost interface. You can also see, that I’m running our application on port 8001. Feel free to choose any other port number – just remember, that for port numbers greater than 1024 you don’t need to have root privileges. So, running the application on port 8001 we can use reverse proxy – like NGINX – to have our API on port 80 or 443, or we can use Azure Load Balancer instead – just run the apps as you see above and create LB rule with public port 80 and private port 8001.
Run locally for testing
Of course, you can run our app locally for dev and test purposes. It does not matter if you are using Windows machine, Mac or Linux – just remember to choose proper version of psycopg2 package in requirements.txt file. I’m running a test environment on my Mac machine and I will test it using cURL tool.
curl -X POST http://127.0.0.1:8001/api/newclient -H 'cache-control: no-cache' -H 'client_name: contoso -H 'content-type: multipart/form-data’ -F client_name=contoso
Using DataGrip I will check if new client appears in clients table:
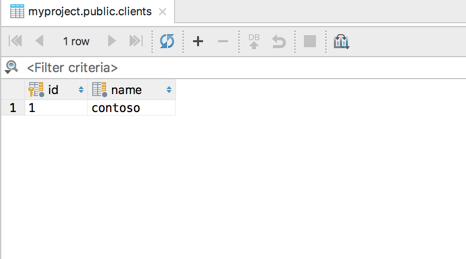
It works! So let’s create new user with some url:
curl -X POST http://127.0.0.1:8001/api/create -H 'cache-control: no-cache' -H 'content-type: multipart/form-data' -F client_id=1 -F url=http://contoso.com

It also works!
It is just a simple sample of what you can achieve, having PostgreSQL as a service in Azure cloud and interoperability of Python language and Azure. You can switch between Linux servers and Azure App Service platform with no problems. You can also migrate in both directions. I hope this tutorial was useful for you and you will start testing your own solution in similar configuration – Python, PostgreSQL, Linux and Azure cloud.